julia turshen’s afternoon cake, slightly adapted (gluten & dairy free)

November 5, 2020

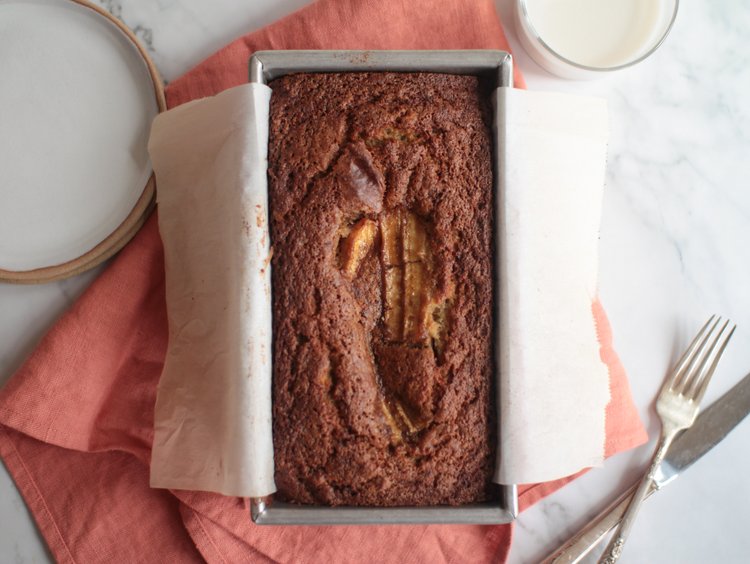
This is probably the first (and so far only) simple cake I’ve mastered. It’s from Small Victories by Julia Turshen, which is a staple cookbook in our home. The kids call it afternoon tea cake because they don’t know that tea cakes have now been rebranded to #snackingcakes :D, such amateurs. I’ve adapted it to be gluten-free, but if you don’t care about that, then good old all-purpose flour, as per the original recipe, will be perfect too.

The cake is pale yellow with orange flecks from the zest. I use organic cane sugar because I love the added depth which enhances both the colour and orange flavor. Powdered sugar is totally optional, but looks pretty if you’re making it for friends or your kids are nutso for it like mine. I’ve brought it to my mom’s for dessert, made it during the hard days of lock down in April, and switched up the flavours (as per Julia’s suggestions) to lemon poppyseed. Side note, Ali “panic” bought a tub of Nutella at the start of the pandemic, and thought it was a brilliant idea to smear it over everything, including his slice of tea cake. It sort of annoyed me, but he’s the guy who puts ketchup on everything and once in hand of a large tub of Nutella, felt it deserved the same treatment as his other favourite condiment. He’s his own man, but this cake doesn’t need Nutella, trust me!

I think having a back-pocket cake is a good thing. A recipe you always have the ingredients for or requires the quickest dash to the corner market or grocery store. I didn’t have one till this cake and it makes me happy (and sort of adult) that I now do. Could this be yours? Do you already have one? Try it and see. Maybe it’ll be this cake which you quietly eat leaning against the kitchen counter or scrolling on your phone or with your second cup of coffee, whatever activities could just be better with a slice of cake.

julia turshen’s afternoon cake (gluten & dairy free)  

*slightly adapted and shared with permission from the author

ingredients:

1 cup gluten-free flour – I use Bob’s Red Mill 1 to 1 baking flour (135 g) (adapted) or 1 cup all-purpose flour (120 g) (orig)

½ cup almond meal – 50 g

1 ½ tsp baking powder (ideally aluminum free)

¼ tsp himalayan pink salt or ½ tsp kosher salt (orig)

2 large eggs

½ cup olive oil

½ cup organic cane sugar (adapted) or ½ cup granulated sugar (orig)

½ tsp vanilla extract

grated zest of one orange

¼ cup fresh orange juice (navels are good, but try it with blood oranges or cara cara)

powdered sugar for dusting (optional)

directions:

1. Preheat your oven to 350°F (180°F).

2.  Line* an 8 inch round pan with parchment paper. Use a little olive oil to grease the sides and bottom of the pan before you put the parchment in.

3.     In a medium bowl whisk the dry ingredients together – flour, almond meal, baking powder, and salt. Make sure there are no clumps.

4.     In a large bowl crack two eggs and whisk till combined. Next, add the olive oil and sugar and whisk till there is almost no grainy-ness from the sugar left. This takes about a minute or two of whisking. Julia suggests testing this by rubbing the mixture between two fingers, which I always do.

5.     Add the orange zest, orange juice, and vanilla extract and whisk till combined.

6.     Whisk in the flour mixture till everything is incorporated, scraping down the sides if necessary.

7.     Pour the batter into the lined and greased cake pan. Lift up the pan just an inch off the counter and gently drop down to pop any air bubbles – this is very satisfying!

8.     Bake for 25 to 30 mins. The outside of the cake should be a warm golden brown and a toothpick inserted through the centre should come out clean, with just a crumb or two clinging to it.

9.     Let the pan rest on a wire rack till completely cool or at least 20 mins. Use a small knife to detach the edges of the cake from the side of the pan, going all the way around. Place a large dinner plate upside down on top of the pan (say a little prayer) and flip the plate and cake pan over. Sometimes I have to give the bottom of the cake pan a little smack with my hand to have it release onto the plate. Don’t worry, it will happen. Gently peel off the parchment and discard. Flip the cake one more time onto whatever you’re serving it on so that the rounded side is facing up. Dust with icing sugar before you serve.

This cake will keep in a sealed container outside for at least two days and in the fridge for a week.

*lining a cake pan 101

There are many ways, but this is how I do it and it makes me feel like I’m in high school geometry – the fun drawing part.

1.     Trace the bottom of the pan onto parchment paper.

2.     Cut out the circle – more on the inside of the line than the outside so it fits snugly in the pan.

3.     Grease bottom of pan and place the parchment circle in making sure it’s stuck to the bottom.

There are people who just grease or grease and flour their pans without any parchment. Lining is what I do so I never have to worry about the cake being stuck or breaking on the way out. Alternatively, forget all this and just eat directly from the cake pan. It’s your cake, you do what you want!

Leave a comment

Your email address will not be published. Required fields are marked *

recipe updates + newsletter

Here you'll receive updates of new posts and recipes, along with a newsletter, once a month.


    latest recipes

    blood orange + beet salad

    olive oil apple crumble

    rice noodles with crispy tofu and kale (gf + df)

    cucumber and melon salad with feta, za'atar and basil

    yellow and red lentil dal / moong and masoor dal

    simple banana bread (gf + df)